Angular와의 통합
이 문서를 읽기 전에 Angular의 기본 개념과 패턴에 익숙해야 합니다. 지식을 다시 확인하려면 Angular documentation을 참고하세요.
DHTMLX Kanban은 Angular와 호환됩니다. DHTMLX Kanban을 Angular에서 사용하는 방법에 대한 코드 예제가 준비되어 있습니다. 자세한 내용은 GitHub의 예제를 참고하세요.
프로젝트 생성
새 프로젝트를 생성하기 전에 Angular CLI와 Node.js를 설치하세요.
Angular CLI를 사용하여 my-angular-kanban-app 프로젝트를 생성합니다. 아래 명령어를 실행하세요:
ng new my-angular-kanban-app
이 가이드를 따르려면, 새 Angular 앱을 생성할 때 서버 사이드 렌더링(SSR)과 정적 사이트 생성(SSG/Prerendering)을 비활성화하세요!
위 명령어는 필요한 모든 도구를 설치하므로 추가 명령어를 실행할 필요가 없습니다.
의존성 설치
새로 생성한 앱 디렉토리로 이동하세요:
cd my-angular-kanban-app
의존성을 설치하고 개발 서버를 시작합니다. yarn 패키지 관리자를 사용하세요:
yarn
yarn start
앱은 로컬호스트(예: http://localhost:3000)에서 실행됩니다.
Kanban 생성
이제 DHTMLX Kanban 소스 코드를 받아야 합니다. 먼저 앱을 중지하고 Kanban 패키지를 설치하세요.
1단계. 패키지 설치
평가판 Kanban 패키지를 다운로드하고, README 파일에 안내된 단계를 따르세요. 평가판 Kanban은 30일간만 사용 가능합니다.
2단계. 컴포넌트 생성
이제 Angular 컴포넌트를 생성하여 Kanban과 Toolbar를 애플리케이션에 추가해야 합니다. src/app/ 디렉토리에 kanban 폴더를 만들고, 그 안에 kanban.component.ts 파일을 추가하세요.
소스 파일 임포트
kanban.component.ts 파일을 열고 Kanban 소스 파일을 임포트하세요. 참고:
- PRO 버전을 사용하고 Kanban 패키지를 로컬 폴더에서 설치한 �경우, 임포트 경로는 다음과 같습니다:
import { Kanban, Toolbar } from 'dhx-kanban-package';
- 평가판 Kanban을 사용하는 경우, 아래 경로를 명시하세요:
import { Kanban, Toolbar } from '@dhx/trial-kanban';
이 튜토리얼에서는 평가판 Kanban의 구성 방법을 안내합니다.
컨테이너 설정 및 Toolbar와 함께 Kanban 초기화
페이지에 Kanban과 Toolbar를 표시하려면, Kanban과 Toolbar의 컨테이너를 설정하고 해당 생성자를 사용하여 컴포넌트를 초기화해야 합니다:
import { Kanban, Toolbar } from '@dhx/trial-kanban';
import { Component, ElementRef, OnInit, ViewChild, OnDestroy, ViewEncapsulation} from '@angular/core';

@Component({
    encapsulation: ViewEncapsulation.None,
    selector: "kanban", // "app.component.ts" 파일에서 <kanban /> 형태로 사용하는 템플릿 이름
    styleUrls: ["./kanban.component.css"], // css 파일 포함
    template:  `<div class = "component_container">
                    <div #toolbar_container></div>
                    <div #kanban_container class = "widget"></div>
                </div>`
})

export class KanbanComponent implements OnInit, OnDestroy {
    // Toolbar 컨테이너 초기화
    @ViewChild("toolbar_container", { static: true }) toolbar_container!: ElementRef;
    // Kanban 컨테이너 초기화
    @ViewChild("kanban_container", { static: true }) kanban_container!: ElementRef;

    private _kanban!: Kanban;
    private _toolbar!: Toolbar;

    ngOnInit() {
        // Kanban 컴포넌트 초기화
        this._kanban = new Kanban(this.kanban_container.nativeElement, {});

        // Toolbar 컴포넌트 초기화
        this._toolbar = new Toolbar(this.toolbar_container.nativeElement, {
            api: this._kanban.api,
            // 기타 구성 속성
        });
    }

    ngOnDestroy(): void {
        this._kanban.destructor(); // Kanban 파괴
        this._toolbar.destructor(); // Toolbar 파괴
    }
}
스타일 추가
Kanban이 올바르게 표시되도록 관련 스타일을 지정해야 합니다. src/app/kanban/ 디렉토리에 kanban.component.css 파일을 생성하고 Kanban 및 컨테이너에 필요한 스타일을 지정하세요:
/* Kanban 스타일 임포트 */
@import "@dhx/trial-kanban/dist/kanban.css";
/* 초기 페이지 스타일 지��정 */
html,
body{
height: 100%;
padding: 0;
margin: 0;
}
/* Kanban 및 Toolbar 컨테이너 스타일 */
.component_container {
height: 100%;
margin: 0 auto;
}
/* Kanban 컨테이너 스타일 */
.widget {
height: calc(100% - 56px);
}
데이터 로딩
Kanban에 데이터를 추가하려면 데이터 세트를 제공해야 합니다. src/app/kanban/ 디렉토리에 data.ts 파일을 생성하고 데이터를 추가하세요:
export function getData() {
    const columns = [
        {
            label: "Backlog",
            id: "backlog"
        },
        {
            label: "In progress",
            id: "inprogress"
        },
        // ...
    ];

    const cards = [
        {
            id: 1,
            label: "Integration with Angular/React",
            priority: 1,
            color: "#65D3B3",
            start_date: new Date("01/07/2021"),
            users: [3, 2],
            column: "backlog",
            type: "feature",
        },
        {
            label: "Archive the cards/boards ",
            priority: 3,
            color: "#58C3FE",
            users: [4],
            progress: 1,
            column: "backlog",
            type: "feature",
        },
        // ...
    ];

    const rows = [
        {
            label: "Feature",
            id: "feature",
        },
        {
            label: "Task",
            id: "task",
        }
    ];

    return { columns, cards, rows };
}
이제 kanban.component.ts 파일을 열고, 데이터를 임포트한 다음 Kanban의 설정 객체에 데이터 속성을 ngOnInit() 메서드 내에서 지정하세요:
import { Kanban, Toolbar } from '@dhx/trial-kanban';
import { getData } from "./data"; // 데이터 임포트
import { Component, ElementRef, OnInit, ViewChild, OnDestroy, ViewEncapsulation} from '@angular/core';

@Component({
    encapsulation: ViewEncapsulation.None,
    selector: "kanban",
    styleUrls: ["./kanban.component.css"],
    template:  `<div class = "component_container">
                    <div #toolbar_container></div>
                    <div #kanban_container class = "widget"></div>
                </div>`
})

export class KanbanComponent implements OnInit, OnDestroy {
    @ViewChild("toolbar_container", { static: true }) toolbar_container!: ElementRef;
    @ViewChild("kanban_container", { static: true }) kanban_container!: ElementRef;

    private _kanban!: Kanban;
    private _toolbar!: Toolbar;

    ngOnInit() {
        const { cards, columns, rows } = getData(); // 데이터 속성 초기화
        this._kanban = new Kanban(this.kanban_container.nativeElement, {
            columns, // 컬럼 데이터 적용
            cards, // 카드 데이터 적용
            rows, // 행 데이터 적용
            rowKey: "type",
            // 기타 구성 속성
        });

        this._toolbar = new Toolbar(this.toolbar_container.nativeElement, {
            api: this._kanban.api,
            // 기타 구성 속성
        });
    }

    ngOnDestroy(): void {
        this._kanban.destructor();
        this._toolbar.destructor();
    }
}
또한 Angular의 ngOnInit() 메서드 내에서 setConfig() 또는 parse() 메서드를 사용해 Kanban에 데이터를 로드할 수 있습니다. setConfig 또는 parse() 메서드는 적용된 변경마다 데이터 리로딩을 제공합니다.
import { Kanban, Toolbar } from '@dhx/trial-kanban';
import { getData } from "./data"; // 데이터 임포트
import { Component, ElementRef, OnInit, ViewChild, OnDestroy, ViewEncapsulation} from '@angular/core';

@Component({
    encapsulation: ViewEncapsulation.None,
    selector: "kanban",
    styleUrls: ["./kanban.component.css"],
    template:  `<div class = "component_container">
                    <div #toolbar_container></div>
                    <div #kanban_container class = "widget"></div>
                </div>`
})

export class KanbanComponent implements OnInit, OnDestroy {
    @ViewChild("toolbar_container", { static: true }) toolbar_container!: ElementRef;
    @ViewChild("kanban_container", { static: true }) kanban_container!: ElementRef;

    private _kanban!: Kanban;
    private _toolbar!: Toolbar;

    ngOnInit() {
        const { cards, columns, rows } = getData(); // 데이터 속성 초기화
        this._kanban = new Kanban(this.kanban_container.nativeElement, {
            columns: [],
            cards: [],
            rows: [],
            rowKey: "type",
            // 기타 구성 속성
        });

        this._toolbar = new Toolbar(this.toolbar_container.nativeElement, {
            api: this._kanban.api,
            // 기타 구성 속성
        });

        // setConfig() 또는 parse() 메서드로 데이터 적용
        this._kanban.setConfig({
            columns,
            cards,
            rows
        });
    }

    ngOnDestroy(): void {
        this._kanban.destructor();
        this._toolbar.destructor();
    }
}
이제 Kanban 컴포넌트를 사용할 준비가 되었습니다. 요소가 페이지에 추가되면 데이터와 함께 Kanban이 초기화됩니다. 필요한 구성 설정도 제공할 수 있습니다. 사용 가능한 전체 속성 목록은 Kanban API docs를 참고하세요.
이벤트 처리
사용자가 Kanban에서 어떤 동작을 하면 이벤트가 발생합니다. 이러한 이벤트를 활용하여 동작을 감지하고 원하는 코드를 실행할 수 있습니다. 이벤트 전체 목록을 확인하세요.
kanban.component.ts 파일을 열고 아래와 같이 ngOnInit() 메서드를 완성하세요:
// ...
ngOnInit() {
    this._kanban = new Kanban(this.kanban_container.nativeElement, {});

    this._kanban.api.on("add-card", (obj) => {
        console.log(obj.columnId);
    });
}

ngOnDestroy(): void {
    this._kanban.destructor();
}
3단계. Kanban을 앱에 추가
KanbanComponent를 앱에 추가하려면, src/app/app.component.ts 파일을 열고 아래 코드로 교체하세요:
import { Component } from "@angular/core";

@Component({
    selector: "app-root",
    template: `<kanban/>`
})
export class AppComponent {
    name = "";
}
그 다음, src/app/ 디렉토리에 app.module.ts 파일을 만들고 KanbanComponent를 아래와 같이 지정하세요:
import { NgModule } from "@angular/core";
import { BrowserModule } from "@angular/platform-browser";

import { AppComponent } from "./app.component";
import { KanbanComponent } from "./kanban/kanban.component";

@NgModule({
    declarations: [AppComponent, KanbanComponent],
    imports: [BrowserModule],
    bootstrap: [AppComponent]
})
export class AppModule {}
마지막으로, src/main.ts 파일을 열고 기존 코드를 아래와 같이 교체하세요:
import { platformBrowserDynamic } from "@angular/platform-browser-dynamic";
import { AppModule } from "./app/app.module";
platformBrowserDynamic()
    .bootstrapModule(AppModule)
    .catch((err) => console.error(err));
이제 앱을 시작하면 Kanban이 데이터와 함께 페이지에 표시됩니다.
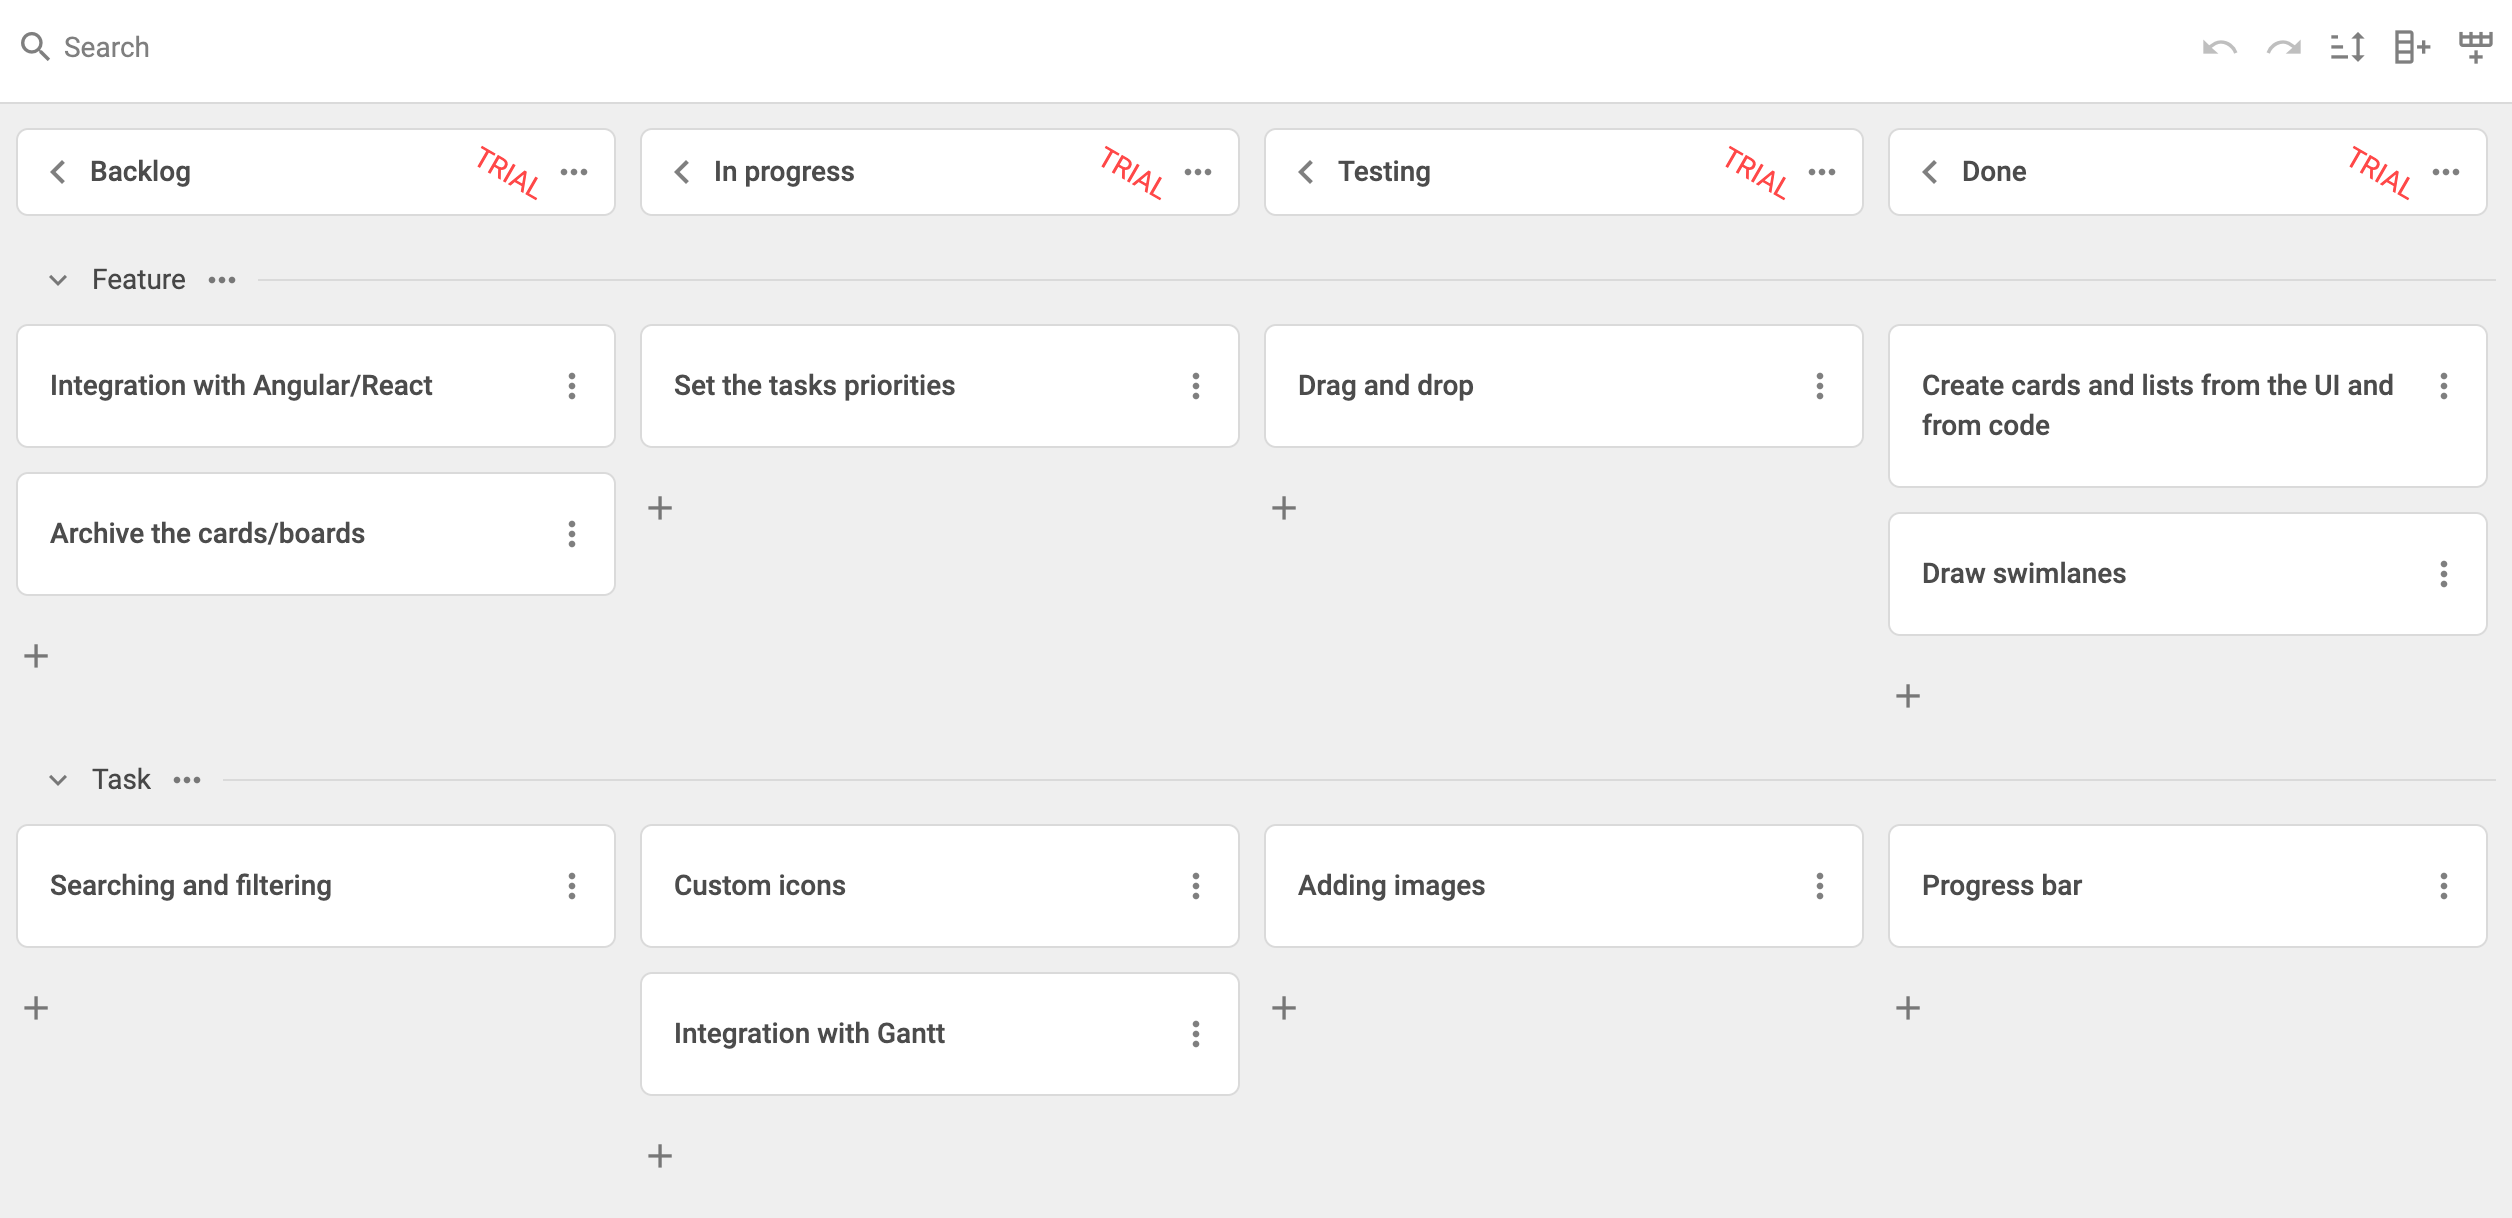
이제 DHTMLX Kanban을 Angular와 통합하는 방법을 알게 되었습니다. 필요에 따라 코드를 자유롭게 커스터마이즈할 수 있습니다. 최종 고급 예제는 GitHub에서 확인할 수 있습니다.